
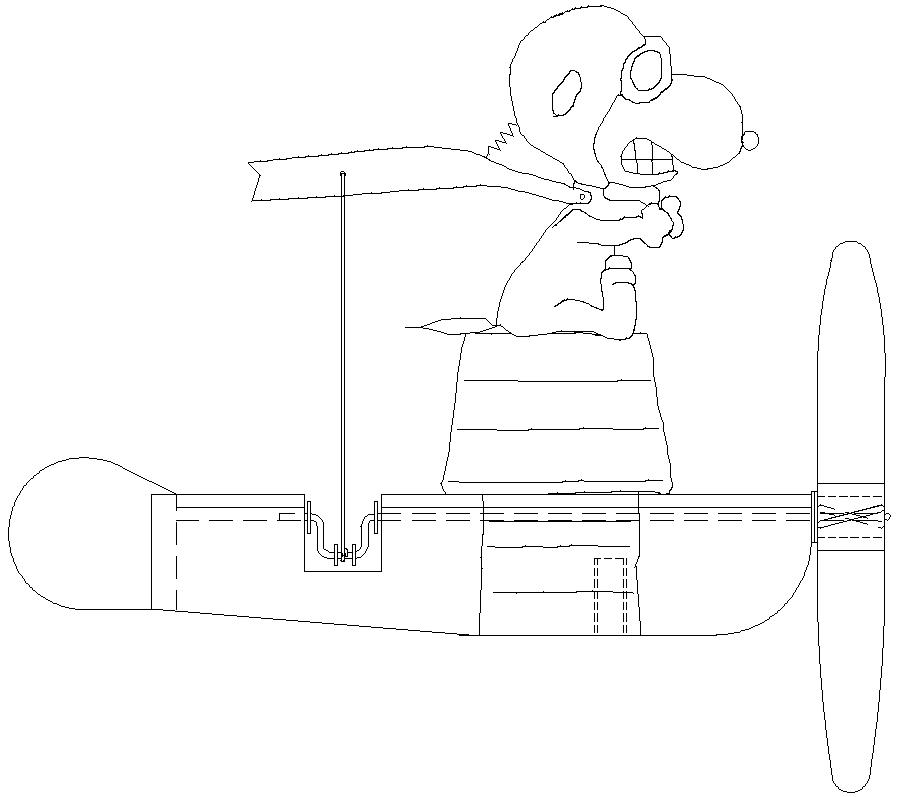
I found an Instructable where Carolina Hunrichse was showing how she and her students had built this cool whirligig. It was based on Snoopy fighting the Red Baron as shown in the 65′ Peanuts comic strip. I decided to make my own version, where I followed their basic idea, but changed a few things. I’m making the whirligig as per the above drawing. Here are a few drawings and a tracing template showing what my version will look like. You will notice that these drawings may not reflect actual/best CAD practice. In some cases, I have drawn them as you would see them with x-ray vision, to make some things clearer to understand. Also, I would like to mention that this page has affiliate links, which means that if you buy something from here, I would get a small commission (at no extra cost to you).
Ok, so the first drawing is the frame section of the whirligig, this is how I planned to make it:
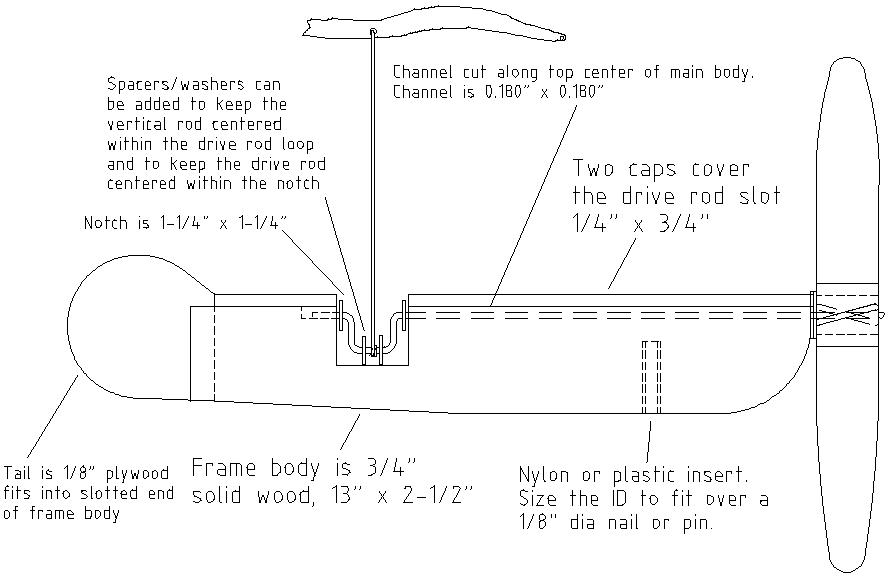
I am showing 3/4″ solid wood as material for the main frame, for the roof of Snoopy’s doghouse, and for Snoopy’s body.
The top edge of the 3/4″” frame body has a slot routed or cut into it. In my case, the slot is routed to a 0.180″ (~3/16″) width and depth, so it will accept a 1/8″ rod without binding. During final assembly, the slot should be lubricated before the rod is fitted. You can pick up steel rod for the drive rod at Home Depot or Lowes. If there isn’t one close to you, you can have some delivered here.
The tail section of the main body is also slotted to accept a tail of 1/8″ ply. The tail component is almost the same shape as a guitar pick (if you want to make Snoopy’s plane look like a Sopwith Camel). If you’re having a hard time finding 1/8″ plywood for the prop blades and doghouse parts, you can order some 1/8″ here. I have shown a plastic insert for the pivot. If you have something different (like a brass insert), that would be ok. I will show an alternate method of mounting also, where a copper tube is inserted at the pivot point.
Between the main frame and the prop hub, I have shown a pair of nylon or plastic washers. I will be using more plastic washers/spacers on the notch part of the drive rod. These will be added to keep the loop of the drive rod centered within the notch, and to keep the small rod that moves Snoopy’s scarf centered within the loop of the drive rod. I’ve been making my own plastic washers by cutting circular pieces from a plastic milk jug and then punching the center hole using a leather punch. It works well.
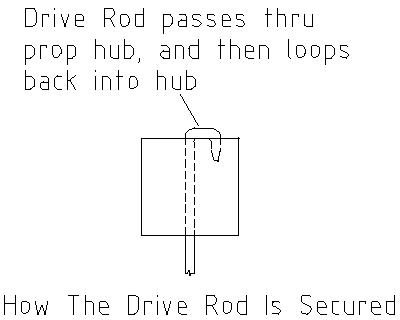
For the drive rod, I will be using a 1/8″ dia steel rod (as sold by Home Depot or Canadian Tire, etc). If you are buying metric sizes, 3mm dia is close. If you want to buy some online, you can have some delivered to you from here. The rod I’m using is plain steel (not threaded rod). It is attached to the prop without nuts, etc. It is fitted into the prop by using a press fit with a bend at the front end of the rod.
For the prop hub, I’m using a piece of wood that is approx. 1.5″ square to make the hub, because that is what I had on hand. I cut a piece that was 1.5″ long to form a cube shape.
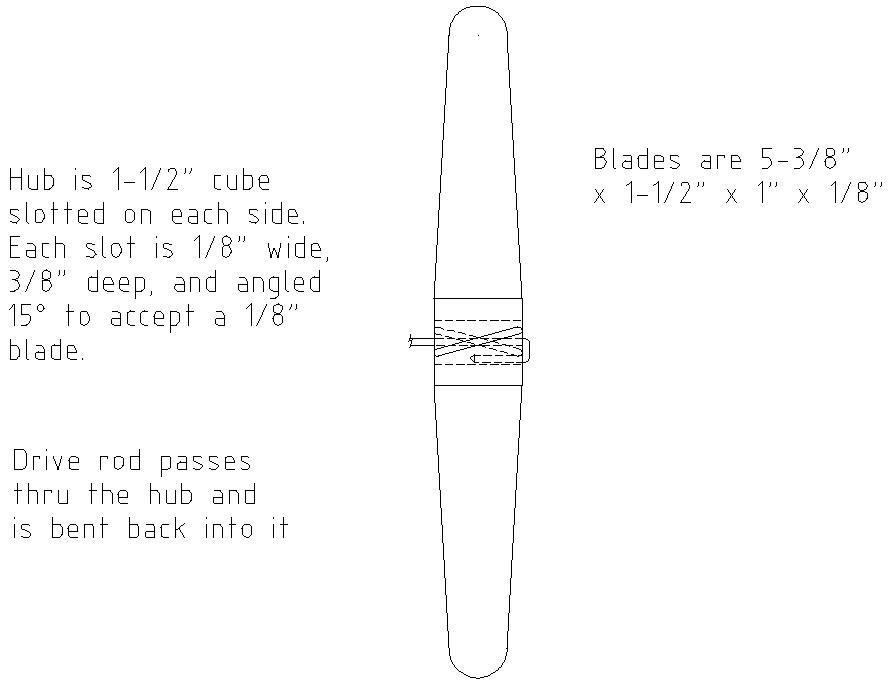
I’m going to use a square hub, as opposed to a round piece of dowel, because that is what I have here. A square hub is easier to work with than a round hub. As long as you want a 4 bladed rotor, it’s ok.
This prop hub works for a 4 bladed rotor. The hub is drilled to accept the 1/8″ dia drive rod, and slots are cut at 15 degrees so that the prop blades can be glued in during final assembly.
The drive rod is fitted thru the prop hub, and is bent to a loop as shown. Drill a pilot hole to accept the rod end and drive the rod end into the prop hub. Glue the rod end in place during the final assembly.
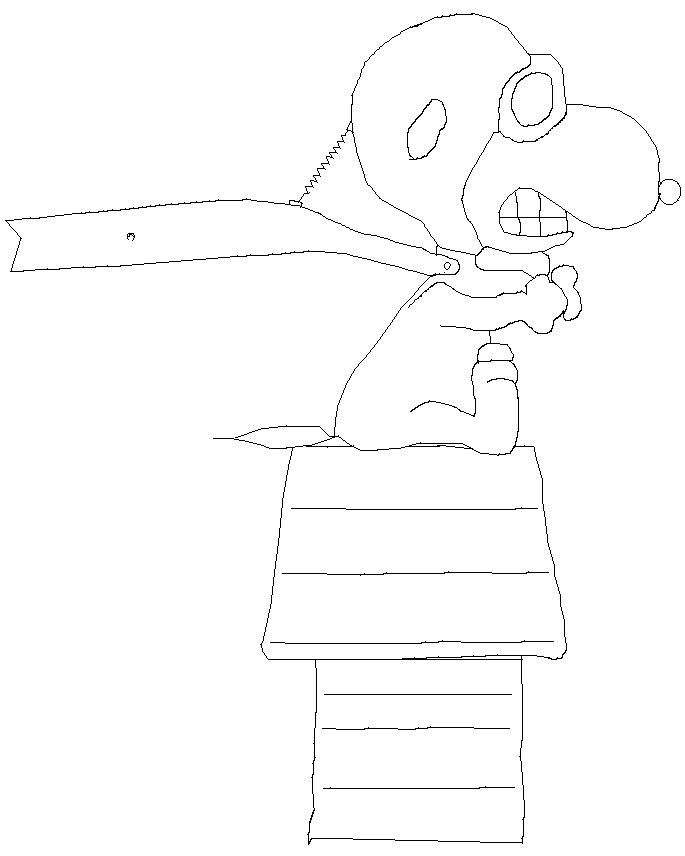
Here is a tracing of Snoopy flying after the Red Baron. I believe it can be printed out full size and used as a cutting /trimming pattern. I wanted to make this whirligig so that Snoopy was large enough to be noticed when the whirligig was assembled.
In order to fasten the Snoopy figure to the main frame, I have drawn it so it can be positioned on top of the main frame, with the doghouse pieces overlapping and sandwiching the 3/4″ thick Snoopy figure in place. If you look at the “as viewed from the front” view, you’ll see what I mean.
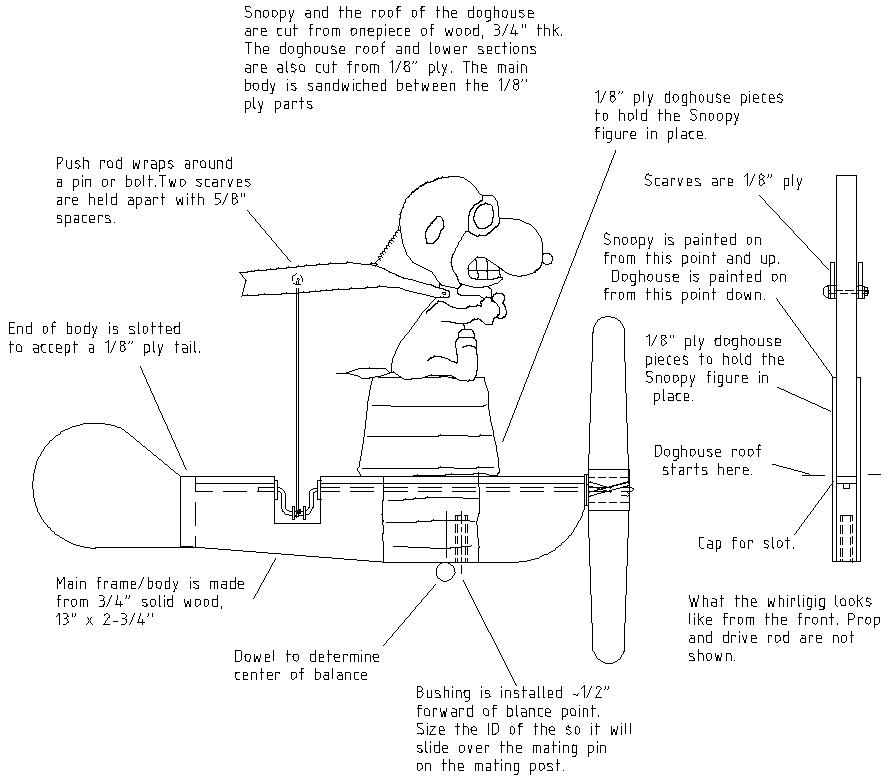
After the whirligig has been fully sanded and assembled, it’s time to determine where the mounting pivot will be located. To do this, position the complete whirligig on a round pencil or dowel, and find the point at which the unit will balance itself in the forward/aft orientation. Mark a line on the whirligig body showing this balance point. Draw another vertical line approx 1/2″ forward of the balance point line. This line will show where the whirligig body should be drilled to locate the pivot bushing. Locating the pivot point 1/2″ forward of the balance point will keep the whirligig pointed into the wind.
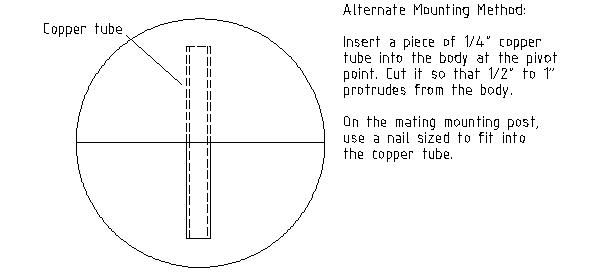
I will show two common ways for mounting the pivot bushing – one method is to use a plastic or nylon bushing as shown in the main assembly drawing. But, you may not have a nylon or plastic bushing available to use for your pivot. If you don’t have a plastic bushing, then you can use a small piece of copper tubing as shown in the diagram above. Drill the pivot point to accept a piece of 1/4″ or 5/16″ copper tube, and insert it to become the pivot bushing. When you select the copper tubing, size the ID (inner dia) so that it will accept a 1/8″ nail or rod to slide inside it. This nail will be used at the top of the mounting post, and will slide into the pivot tube/bushing.
Ok so this is an image that I’m going to follow and use as a guide to colour my Snoopy figure. I will be shading the teeth and adding an outside border as you see here.

I want the Snoopy figure to stand out, and the rest of the whirligig to be in the background, so I will be painting the main body/frame a grey colour so that Snoopy is more noticeable than the rest of the unit.
I am also considering painting the prop with a clear coat of spar varnish, because a spar varnished prop looks really cool.
One important thing about painting is that when you are finished, it’s important that all surfaces be coated, so that water cannot be absorbed to start the rot or delamination process. Coat every spot on the whirligig.