
The idea for this whirligig came from a 1930’s kid’s pull toy that I found on the Wayback machine. I changed a few things so that the idea could work as a whirligig, made up my own man figures and this is the result. Before I go any further, I would like to tell you that these pages contain affiliate links – which means that if someone were to buy something here, I might get a small commission (at no extra cost to you).
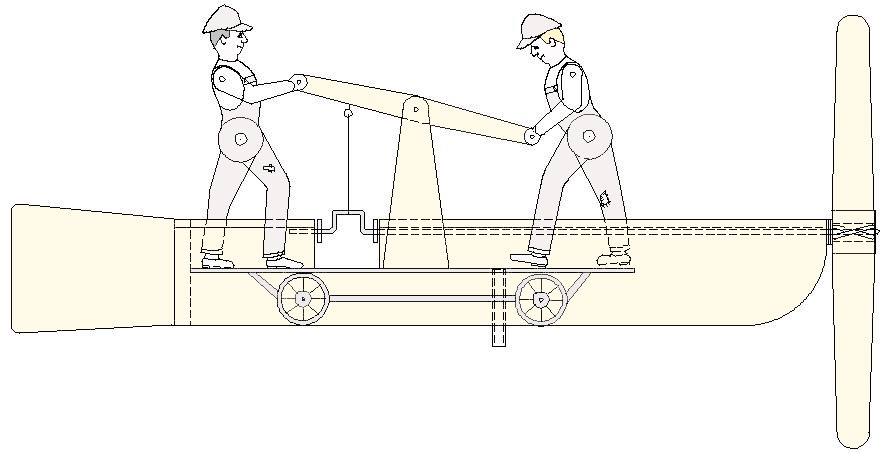
The Railcar – The main frame is 20″ long, and the figures are approx 8″ in height. The rail car platform, under carriage, and wheels are painted onto the main frame. The legs of the man figures are fastened onto either side of the main frame, and they support the upper bodies of the man figures. The shoulders, wrists, and hip joints would all be swivel connections. Judging by the number of parts here, it looks like this whirligig would need to be assembled and reassembled to make sure everything fits.
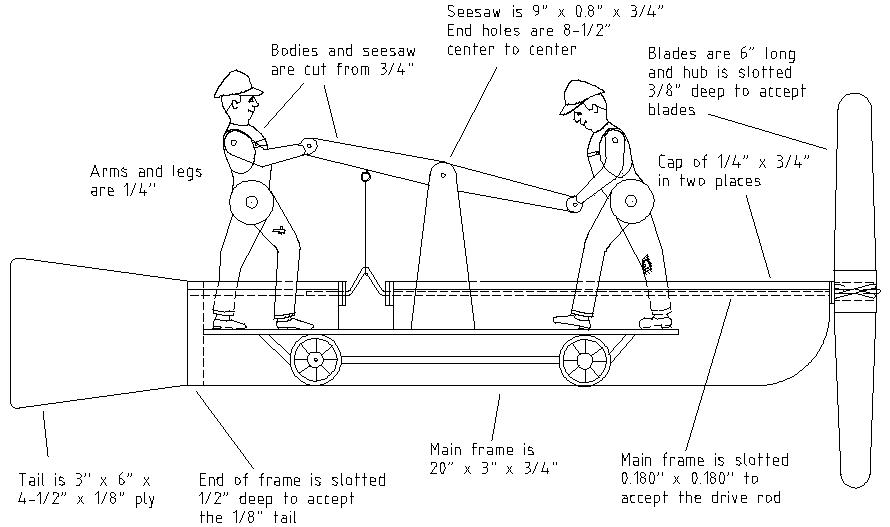
The main frame/body is made from 3/4″ wood. The upper bodies of the man figures and the top of the seesaw deal are made from 3/4″ as well. The triangular seesaw mounts, the legs, and the arms are made from 1/4″ wood, The arms are made so they pivot at the shoulders and at the wrists. The legs are fastened to either side of the frame body and they hold the upper bodies of the man figures in place. As I have scaled it, the seesaw deal is 8-1/2″ from outer pivot point to outer pivot point. Plastic washers or spacers can be used between the parts that swivel. For the drive rod, you can pick up some 1/8″ dia rod at Home Depot or Lowes. If you would prefer to have some steel rod delivered, you can get some here.

The prop is made with a 1.5″ cube acting as the central hub, with 4 blades fitted into the hub. The blades are 6″ x 1-1/2″ x 1″ x 1/8″ ply (If you have 1/8″ solid wood, or you can plane down to 1/8″ thickness, that is better yet). If you want to have some 1/8″ ply delivered, you can get some here. Each blade is 1-1/2″ at the base and 1″ at the tip. The tips are rounded at their ends to 1″ dia (1/2″ rad).
The hub shown is a 1.5″ cube. It has a 1/8″ dia. hole drilled through it to allow the drive rod to run through. It also has a 1/8″ wide slot cut into each side to accept the blades. Each slot is angled 15 degrees, and is cut 1/4″ to 3/8″ deep to accept the blades. The prop sketch and other drawings only show the upper and lower blades. The horizontal facing blades are not included in order to show the hub slots.
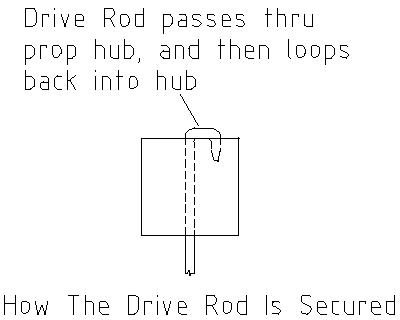
The drive rod passes through the central bub and is looped back into it.
How bushings can be used
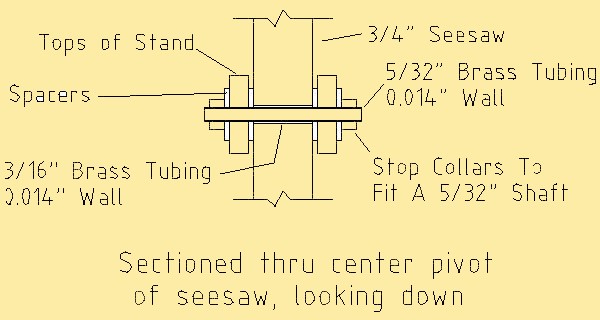
The drawing above shows how I would add bushings to the pivot joints. If you were to cut horizontally through the pivot joint at the center of the seesaw and look down, you would see something like what I have shown above. An inner axle, made of 5/32″ ID brass tubing, and an outer brass tube of 3/16″ ID that telescopes over the axle. You can get some of this 3/16″ tubing here, and the 5/32″ tubing here. The thing that I like about using this brass tubing is that one size telescopes or sleeves over the other, so it works well for a bushing. You can get this tubing at most hobby shops, or here online, and I will be adding links to a few of these suppliers. If you want to use actual ball bearings, this application would work well. In the above shaded drawing, I am also showing stop collars which slide onto the 5/32″ axle shaft and hold everything together. If you can’t find these near you, then these are what I’m referring to: 4mm (5/32″) Drill Stop Collars. These will fit a 5/32″ shaft.
The mounting insert (on the bottom of the frame) is sized for an ID of 1/8″ (OD of 1/4″). It can be brass, plastic, copper tube, or whatever material is available, as long as the ID is correct. This insert is sized so the ID will fit a mating 1/8″ diameter mounting pin. The bushing/insert is located somewhere on the forward half of the whirligig, so that the unit will want to point into the wind.
When the whirligig is painted, it is important that all surfaces be totally sealed with paint. Any areas not coated will eventually soak up moisture and swell. Plywood pieces will swell and delaminate, so ensure that all surfaces are painted, especially plywood pieces.